
Tesseract is an open-source cross-platform OCR engine initially developed by Hewlett Packard, but currently supported by Google. In this post, I want to share some useful tips regarding how to get maximum performance out of it. I won’t cover the basics which can be found in official docs.
0. Know your data
The top most important tip for any data processing task, and OCR is not an exception. Is your OCR suddenly works terrible on production? Is test performance low? Check what images you’re passing to the engine. No, seriously. If you’re looking into low OCR performance issue, first thing dump the image right before OCR engine call and make sure it’s not cropped, distorted, have wrong channel order, etc.
1. Configure parameters
Now to actual Tesseract-related tips. Here’s the list of most important Tesseract parameters:
- Trained data. On the moment of writing,
tesseract-ocr-engAPT package for Ubuntu 18.10 has terrible out of the box performance, likely because of corrupt training data. Download data file separately here and add--tessdata-dirparameter when calling the engine from console. - Page Segmentation Mode (
--psm). That affects how Tesseract splits image in lines of text and words. Pick the one which works best for you.
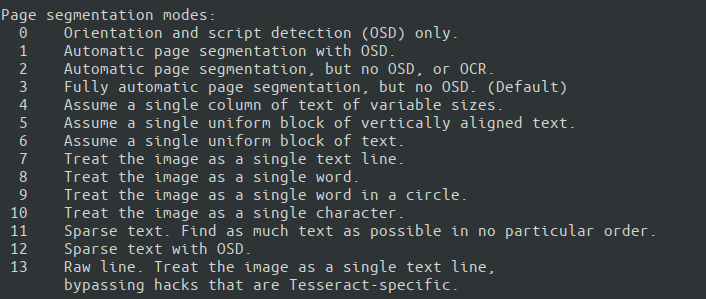
Automatic mode is much slower than more specific ones, and may affect performance. Sometimes, it’s feasible to implement a simple domain-specific field extraction pipeline and combine it with Single Line (7) or Single Word (8) page segmentation mode.
- Engine Mode (
--oem). Tesseract has several engine modes with different performance and speed. Tesseract 4 have introduced additional LSTM neural net mode, which often works best. Unfortunately, there’s no LSTM support on Android fork yet.

- Character whitelist (
-c tessedit_char_whitelist="XYZ"). In version 4, whitelists are supported only in legacy engine mode (--oem 0
Here’s a sample grayscale image with corresponding Tesseract executable call:

tesseract --tessdata-dir . driving_licence.png stdout --oem 3 --psm 7

2. Correct the skew
Tesseract usually successfully corrects skew up to 5 degrees. However, it’s best to correct image rotation before passing it to OCR.
3. Don’t crop the image too close
Tesseract expects the image to have some empty fields (of a background color) around text. That’s rarely the case when text areas are extracted automatically and you may wonder why OCR performance is so bad. To fix that, just pad the images with background color on 20% of text line height. Let’s see how cropping will affect OCR of the image above:

It still looks perfectly readable, but here is what we get when trying to OCR it:

4. Postprocess OCR results
Consider OCR output to be raw data. To get good results, you still need to implement assumptions and knowledge of the specific problem domain.
- Numeric and text fields. If you expect the field or a single “word” to have either digits or letters, apply right substitution for ambiguous characters. These are most common:
| 5 → S | 1 → I | 0 → O |
| 2 → Z | 4→ A | 8 → B |
- Dictionary words. For text which is expected to consist of dictionary words, perform dictionary checks within some low edit distance, or use a spell checking library. Despite that Tesseract have this functionality built-in, it often didn’t work as expected for me.
- Punctuation. Characters like
-.,;are hard for OCR. If, say, you need to parse a date, consider you don’t have them. Use regular expression, like this:[0-9]{2}[-\\. ]{1,2}[0-9]{2}[-\\. ]{1,2}(19|20)[0-9]{2}
Finally, refer to Tesseract performance guide for more ideas. Good luck!