
With various flavors of convolutional neural nets being all the rage for image processing, one may undeservedly forget about a family of advanced classical algorithms for image classification and object detection. These are SIFT, SURF, (A)KAZE and ORB, with latter one being the popular choice, because it’s:
- Rotation and scale invariant. Most widely used neural net architectures aren’t.
- Fast. Able to run at 30+ FPS on a single desktop CPU core with 0.3 MP frames.
- Free. Some other algorithms, like SIFT and SURF, are patented and require licensing for commercial use.
- Robust. Able to extract usable features from a single sample image.
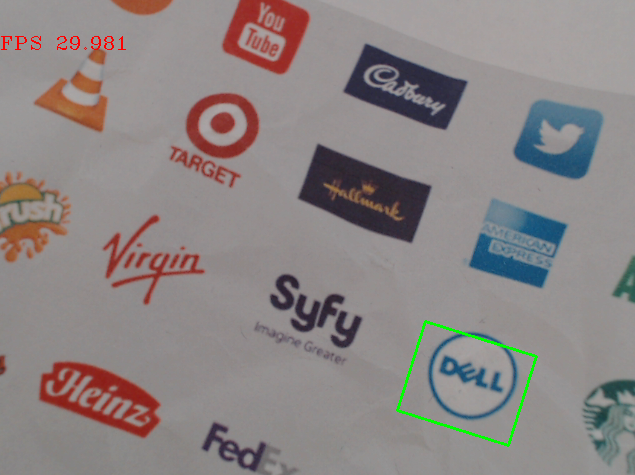
Let’s look at ORB from engineering perspective, without re-citing the wikipedia and papers on the algorithm. Suppose we want to detect a DELL logo (completely random choice) on the input image:
First, we need to initialize the detector and set parameters:
 def createDetector():
    detector = cv2.ORB_create(nfeatures=2000)
    return detector
One of a few parameters which can be experimented with without digging deeply into the algorithm implementation is nfeatures – a maximum number of resulting feature vectors detector will estimate. It worth slightly increasing it above the default value of 500. Some additional info on ORB parameters can be found here and here.
Next, let’s define a function to get keypoint coordinates and descriptor vectors from the image:
def getFeatures(img):
    gray = cv2.cvtColor(img, cv2.COLOR_BGR2GRAY)
    detector = createDetector()
    kps, descs = detector.detectAndCompute(gray, None)
    return kps, descs, img.shape[:2][::-1]
The next step is to search for a bounding box of our logo on a query image, here’s how to do it (see comments):
def detectFeatures(img, train_features):
    train_kps, train_descs, shape = train_features
    # get features from input image
    kps, descs, _ = getFeatures(img)
    # check if keypoints are extracted
    if not kps:
        return None
    # now we need to find matching keypoints in two sets of descriptors (from sample image, and from current image)
    # knnMatch uses k-nearest neighbors algorithm for that
    bf = cv2.BFMatcher(cv2.NORM_HAMMING)
    matches = bf.knnMatch(train_descs, descs, k=2)

    good = []
    # apply ratio test to matches of each keypoint
    # idea is if train KP have a matching KP on image, it will be much closer than next closest non-matching KP,
    # otherwise, all KPs will be almost equally far
    for m, n in matches:
        if m.distance < 0.8 * n.distance:
            good.append([m])

    # stop if we didn't find enough matching keypoints
    if len(good) < 0.1 * len(train_kps):
        return None

    # estimate a transformation matrix which maps keypoints from train image coordinates to sample image
    src_pts = np.float32([train_kps[m[0].queryIdx].pt for m in good
                          ]).reshape(-1, 1, 2)
    dst_pts = np.float32([kps[m[0].trainIdx].pt for m in good
                          ]).reshape(-1, 1, 2)

    m, mask = cv2.findHomography(src_pts, dst_pts, cv2.RANSAC, 5.0)

    if m is not None:
        # apply perspective transform to train image corners to get a bounding box coordinates on a sample image
        scene_points = cv2.perspectiveTransform(np.float32([(0, 0), (0, shape[0] - 1), (shape[1] - 1, shape[0] - 1), (shape[1] - 1, 0)]).reshape(-1, 1, 2), m)
        rect = cv2.minAreaRect(scene_points)
        # check resulting rect ratio knowing we have almost square train image
        if rect[1][1] > 0 and 0.8 < (rect[1][0] / rect[1][1]) < 1.2:
            return rect
    return None
Now, to search for a logo on image, we just need to call these functions and visualize result:
# get train features
img = cv2.imread('logo_train.png')
train_features = features.getFeatures(img)
# detect features on test image
region = features.detectFeatures(frame, train_features)
if region is not None:
    # draw rotated bounding box
    box = cv2.boxPoints(region)
    box = np.int0(box)
    cv2.drawContours(img, [box], 0, (0, 255, 0), 2)
# display the image
cv2.imshow("Preview", img)
Here’s how it works for a test image with slight distortion and rotation:
Full code processing images from camera is available on github.
To improve this basic implementation of image detector, you might want to adjust some parameters, add Kalman filter for stabilization, create a more robust set of features using multiple training images, etc. Hope this will help you to start!